Wrapping Class-based Arduino Libraries
Many libraries already have been written for Arduino and they can be included into XOD to use the full power of the existing ecosystem.
To understand this guide, you have to know how to write C++ code in XOD and how to work with custom types. Also, you need to have some experience of working with C++ libraries for Arduino.
Imagine that we want our Arduino board to turn the built-in led on or off when we bring an NFC tag, such as travel pass, to it.
Consider that we have no XOD library to work with RFID/NFC scanner PN532 (xod-dev/pn532-nfc), and try to make it on our own. In order not to go into the details of working with tags, we will take the Adafruit-PN532 Arduino library and just wrap it in XOD nodes.
To do this, we need to:
- Declare a new custom type
pn532-device, which describes an RFIC/NFC module and how is it connected to an Arduino board. There may be several instances of this node, one for each hardware module. - Declare a dependency on a third-party C++ library so that XOD knows where to download it, saving users from manual install.
- For the new type, create action nodes that correspond to the functions and methods provided by the third-party C++ library.
- Create a quick-start node that reads an NFC tag to serve most common purposes.
- Create few example patches.
Create device and require library #
Take a look on class constructors in the Adafruit library:
class Adafruit_PN532{
    public:
        // Software SPI
        Adafruit_PN532(uint8_t clk, uint8_t miso, uint8_t mosi, uint8_t ss);
        // Hardware I2C
        Adafruit_PN532(uint8_t irq, uint8_t reset);
        // Hardware SPI
        Adafruit_PN532(uint8_t ss);
        // …
};
The class has three constructors for different connection types: HardwareSPI, HardwareI2C, and SoftwareSPI. Choose the second one and create the device node for the I2C connection:
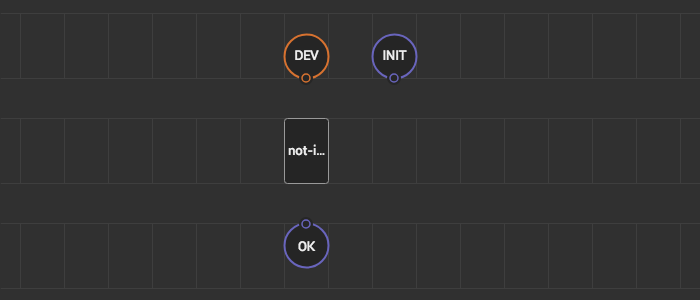
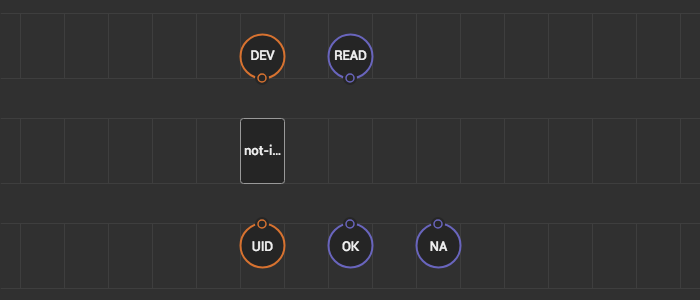
- Create a new patch “pn532-device”. The name of the patch becomes the name of the new custom type, which we will later pass into action nodes. Pay attention to “device” in the name. Conventionally, any nodes that create a new type to work with hardware should be named as
xxx-device. - Place the node
not-implemented-in-xod, because we have to create an instance of the class from C++ library. - Place the node
output-selfand set its label toDEV. Such way we’re defining a new custom type. After that you can findinput-pn532-deviceandoutput-pn532-deviceterminals in Project Browser. - Place one terminal
input-portto specify interruption port with labelIRQ. This is one of two ports, which are required in the constructor arguments. This port is used to notify Arduino board that the module detected an NFC tag. The second port (reset) we do not need, because it is necessary to restart the module only if you are working with it at a low level and did something wrong.
Double click on not-implemented-in-xod to open the C++ editor and type on the first line:
#pragma XOD require "https://github.com/adafruit/Adafruit-PN532"
This is a special line tells XOD, that this node needs a third-party library. At the first compilation XOD will check its presence in your workspace and if it does not find a library, it will offer to download and install it just by clicking on the button in the IDE.
So we installed library and now we are able to use it. Let’s include it and create an instance of the class:
// Tell XOD where it could download the library and its dependencies:
#pragma XOD require "https://github.com/adafruit/Adafruit-PN532"
#pragma XOD require "https://github.com/adafruit/Adafruit_BusIO"

// Include C++ library:
#include <Adafruit_PN532.h>

node {
    meta {
        // Define our custom type as a pointer on the class instance.
        using Type = Adafruit_PN532*;
    }

    // Keep Adafruit_PN532 object in state.
    // Instead of the `reset` port, specify `NOT_A_PORT`, since it is not needed
    Adafruit_PN532 nfc = Adafruit_PN532(constant_input_IRQ, NOT_A_PORT)

    void evaluate(Context ctx) {
        // It should be evaluated only once on the first (setup) transaction
        if (!isSettingUp())
            return;

        emitValue<output_DEV>(ctx, &nfc);
    }
}
We included the library and created the instance of the class. Let’s create action nodes to initialize the NFC scanner and start working with it.
Action nodes #
To work with the instance of a class in XOD we need to wrap method calls in nodes. To access the instance itself we pass it the custom type value we defined earlier. Thus, any action node for this library will contain an input of type pn532-device.
The methods can invoke some side-effects (communication with the hardware module) and be asynchronous, that is our program won’t halt and wait until some side-effect are done. Therefore, for each such action node, we have to add some pulse terminals: one to run the action and two to notify about completion, either successful or failed.
For our task we create two action nodes:
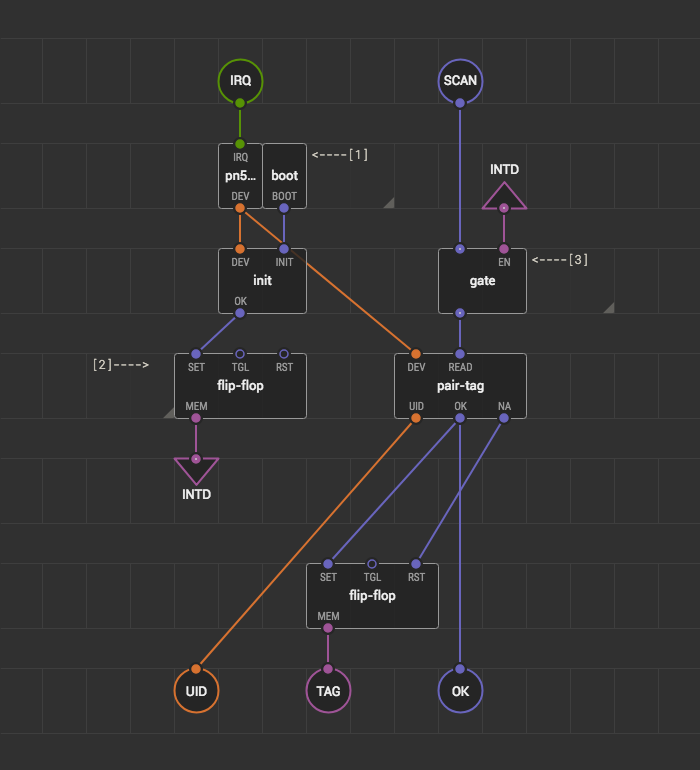
init— to initialize the hardware modulepair-tag— to detect an NFC tag and read its UID
Pay attention, that names of action nodes begin with verbs. By convention, names of any nodes which do instructions “what to do” in imperative style must begin with a verb (init, read-byte, pair-tag, write-line and etc).
Create node init #
Let’s create a node that initializes the NFC scanner.
The input-pn532-device terminal was automatically generated after adding the output-self terminal to the pn532-device patch. You can find it in the Project Browser.
Follow comments in the C++ code:
node {
    void evaluate(Context ctx) {
        // The node responds only if there is an input pulse
        if (!isInputDirty<input_INIT>(ctx))
            return;

        // Get a pointer to the `Adafruit_PN532` class instance
        auto nfc = getValue<input_DEV>(ctx);

        // Initialize RFID/NFC module
        nfc->begin();

        uint32_t versiondata = nfc->getFirmwareVersion();
        if (!versiondata) {
            // If the module did not respond with its version,
            // it's a connection error or something wrong with the module
            raiseError(ctx); // Initialization error
            return;
        }

        // Set the max number of retry attempts to read from a card
        // This prevents us from waiting forever for a card, which is
        // the default behavior of the PN532.
        nfc->setPassiveActivationRetries(1);

        // Configure the board to read an RFID/NFC tags
        nfc->SAMConfig();

        // Pulse that module initialized successfully
        emitValue<output_OK>(ctx, 1);
    }
}
Now we can initialize the RFID/NFC module.
Do not forget to give descriptions to terminals and patches.
Storing and comparing UIDs #
The UID is a set of bytes, which may be sized from 4 to 10 bytes for different types of cards and different types of UID (Single size UID, Double size UID, RUID, NUID, FNUID) by the specification ISO14443A. For reliability, let’s pack this value into another custom data type.
Create a new patch nfc-uid: 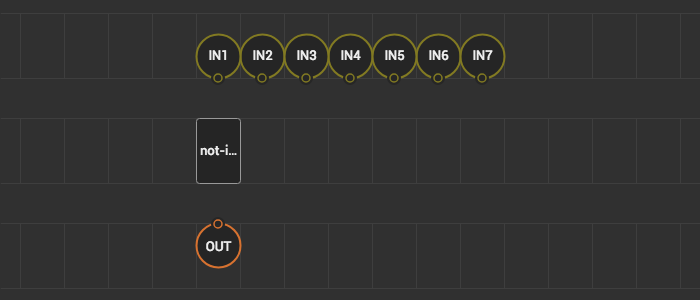
Note that here we have 7 inputs of type byte so that we can manually set the UID of an NFC tag. This will be useful when we’ll compare a UID of the detected tag and the UID of our activation tag.
Let’s write C++ code:
node {
    meta {
        // Declare custom type as a struct
        // in which we will store an array of bytes
        struct Type {
            uint8_t items[7];
        };
    }

    void evaluate(Context ctx) {
        Type uid;
        // Put each value from input terminal into the array of bytes
        uid.items[0] = (uint8_t)getValue<input_IN1>(ctx);
        uid.items[1] = (uint8_t)getValue<input_IN2>(ctx);
        uid.items[2] = (uint8_t)getValue<input_IN3>(ctx);
        uid.items[3] = (uint8_t)getValue<input_IN4>(ctx);
        uid.items[4] = (uint8_t)getValue<input_IN5>(ctx);
        uid.items[5] = (uint8_t)getValue<input_IN6>(ctx);
        uid.items[6] = (uint8_t)getValue<input_IN7>(ctx);

        emitValue<output_OUT>(ctx, uid);
    }
}
Likewise, we can make another node, which unfolds the UID into a set of bytes with seven outputs from the bottom (unpack-nfc-uid is a good name for it). This can be useful if we want to compare specific bytes after reading the UID. For example, Double size UID contains a manufacturer ID at the zero position.
For our task it is important to compare a UID of the detected tag with the UID of our tag: we don’t want anyone to turn our led on and off, right? Let’s create a new node equal(nfc-uid). Note that we defined our data type nfc-uid in the parentheses. It is a specialization node, so any xoder can use the familiar xod/core/equal node even to compare UIDs.
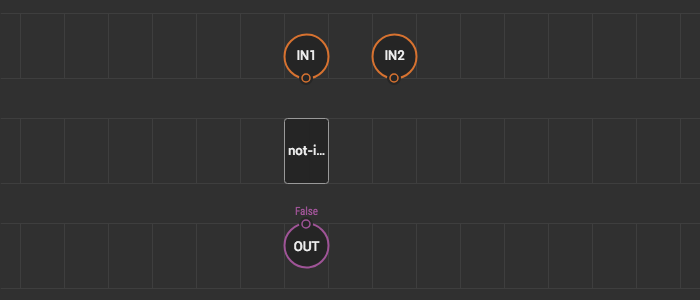
To compare two byte arrays we use the standard function memcmp:
node {
    void evaluate(Context ctx) {
        auto uidA = getValue<input_IN1>(ctx);
        auto uidB = getValue<input_IN2>(ctx);

        // Function `memcmp` compares data by two pointers
        // and returns `0` if they are equal
        bool eq = memcmp(uidA.items, uidB.items, sizeof(uidA.items)) == 0;

        emitValue<output_OUT>(ctx, eq);
    }
}
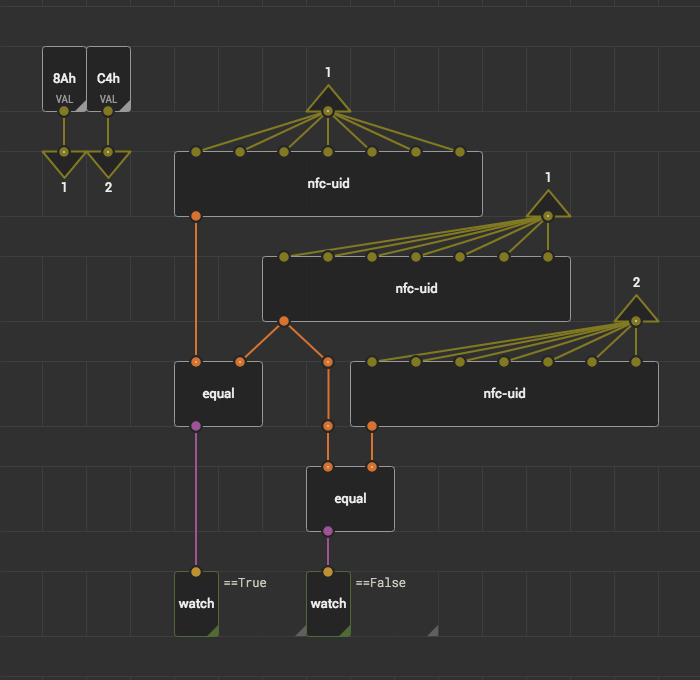
Let’s check that everything works. Create a demonstration patch example-uid-equals.
Now we can create, store, and compare UIDs. It’s time to read the UID from our NFC tag.
Create node pair-tag #
To interact with an NFC tag we should detect it first and read its UID. That is why the node is not called read-uid, but pair-tag.
Follow the C++ code:
node {
    void evaluate(Context ctx) {
        if (!isInputDirty<input_READ>(ctx))
            return;

        auto nfc = getValue<input_DEV>(ctx);

        // Create a variable of a custom type
        // by getting the type from output terminal
        typeof_UID uid;
        // Create a variable to store length of the UID
        uint8_t uidLength;

        // Fill UID with zeroes
        memset(uid.items, 0, sizeof(uid.items));
        // Detect the tag and read the UID
        bool res = nfc->readPassiveTargetID(
            PN532_MIFARE_ISO14443A,
            uid.items,
            &uidLength
        );

        if (res) {
            emitValue<output_UID>(ctx, uid);
            emitValue<output_OK>(ctx, 1);
        } else {
            emitValue<output_NA>(ctx, 1);
        }
    }

}
Everything is ready to read the UID of the tag. But in fact, the library from Adafruit allows us to read not only the UID of the tag but also to read and write data to the tag. And if you’re wrapping a library, we recommend wrapping at least the most common methods to avoid having multiple wrappers of the same library that only have a limited set of features.
Try to make read-page and write-page nodes by yourself using the mifareultralight_ReadPage and mifareultralight_WritePage methods from the Adafruit library. And make an example patch to count the number of times the tag has touched the NFC scanner, keeping this counter on the tag. You will need the MIFARE Ultralight labels to work with these methods.
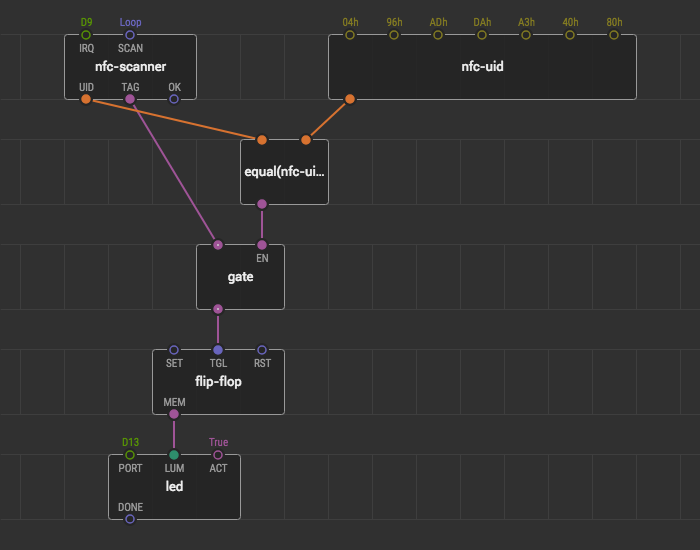
Quick start node #
We could stop right here. But let’s make yet another thing: a quick start node. Imagine, this library was done by someone else and you just want to use it. Will it be handy to use a chain of nodes pn532-device, init, read-uid, just to know is there any NFC tag near the module?
Let’s simplify our lives and write a nfc-scanner node that solves most common tasks with just one node. Such nodes are called quick start nodes.
- Init the RFID/NFC module on boot;
flip-flopwill be set toTruewhen module inited to open the gate;gateprotects against attempts to detect an NFC tag when the module is not yet initialized.
It’s time to make our example-nfc-scanner:
Creating example patches within the library is a good practice. It allows you to immediately check the workability and usability of the library. In the future users will thank you for examples.
Well done!
Summary #
-
To use a third-party library specify a special pragma-instruction in the code:
#pragma XOD require "https://github.com/some/library" -
In addition to specifying where to get the library, do not forget to include it in the code:
#include <SomeLibrary.h> -
When you wrapping methods in nodes use verbs in their names (
pair-tag,write-page). -
Create quick start nodes to solve common problems (
nfc-scanner,nfc-writer)
Now you can add project description and share it with the community.