Quick Setup of W5500 Ethernet Shield for Internet
Ethernet Shield built around the W5500 ethernet chip is a popular extension board in the Arduino world to give your device a wired connection to a local network or internet. The board is also known as “Ethernet Shield 2.”
Its physical connection is trivial:
- Put Ethernet Shield onto your Arduino board
- Connect it to a router which provides internet access with an ordinary RJ-45 patch cord cable
Programming requires some effort though.
When you connect a PC to the router with a cable, in most cases, it automatically links to the local area network (LAN), and you are ready for browsing. You don’t have to do anything because your operating system (OS) be it Windows, macOS, or Linux takes care and performs all the steps required to enter the LAN. Microcontrollers don’t have an OS, so you’re responsible for establishing the connection.
Fortunately, there are nodes for the Ethernet Shield to make it simple in XOD. Hardware specific nodes for it are in the xod-dev/w5500 library and hardware-neutral nodes are in xod/net.
Ethernet Shield node #
In the simplest case, when you have a stock Ethernet Shield board and it’s the only DIY-device in your local network it is enough to place a single xod-dev/w5500/ethernet-shield on your patch.

The node has a CONN pulse which initiates the connection process. Make sure the CONN is bound to On Boot so that the shield tries to connect to the router when the program starts.
The node outputs INET which represents the resulting internet connection along with OK pulse which fires on success.
When enthernet-shield receives a pulse on CONN it starts negotiating network parameters with the router and automatically sets up the device’s IP address, gateway address, network mask, and DNS server IP. Upon successful connection, the node emits a pulse on OK and sets INET to a value which is expected by other nodes made for network communication.
The most straightforward way to check whether the link is up is to output own local IP address. The xod-dev/w5500/lan-ip can extract the IP address from INET object and xod/net/format-ip is capable of formatting the IP as a human-readable string like “192.168.1.101”. You may use an LCD or a watch node to see the result:
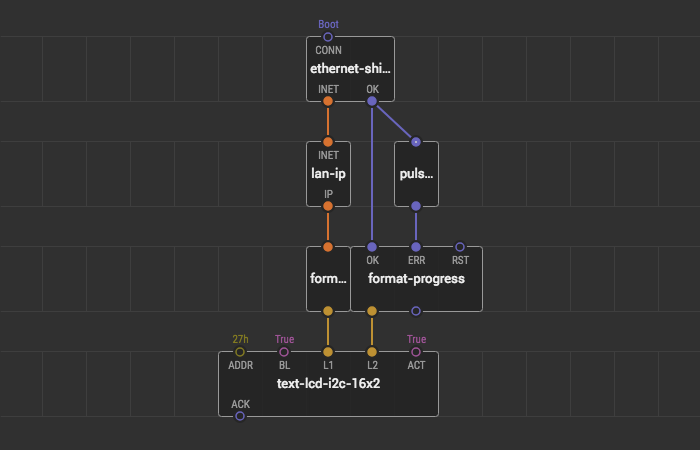
For demonstration purposes we also use a format-progress node here which outputs a string “…”, “OK” or “ERR” to the second line of the display showing the connection progress.
Upload the patch to your board. In an ordinary network it will show:
- “0.0.0.0” / “…” for less than a second
- then something like “192.168.1.101” / “OK”
Implications #
Beware, the quick way described here has some drawbacks:
- It assigns a locally administered hard-coded MAC address “02:00:00:78:6F:64” to the device which should be unique in a network. You should change it if you have multiple devices or assign an address from the commercial pool if the device intended to be sold.
- It always uses DHCP to obtain network settings which might not be configured on your router and even if set up properly consumes precious microcontroller resources if compared to the static configuration.
If you are OK with the basic connection, you can start network communication. For example, fetch some data from the web with HTTP GET. Or you can make your connection more robust by using a unique MAC and static IP setup.