Creating Libraries
This article will guide you through the process of creating and publishing your own library.
Starting a library #
Here’s a little secret: libraries and projects in XOD have no technical difference. The distinction is conventional. Your project becomes a library when you decide that it is.
To start a new library, hit “File → New Project.”
Crafting nodes #
Make the nodes you want to be in the library like you would do for any project.
Documenting the nodes you’re going to share is extremely important for libraries. A lack of short descriptions for nodes and their pins will very likely ruin your effort and make the library unusable to others.
Adding example patches #
The obvious step is to test your nodes in action before sharing them. One of the possible ways to do so is by creating several example patches. They are regular patches with a conventional -example suffix in their name like mcp3002-adc-example.
On such patch, place the node to be tested and use the most basic input/output facilities: watches, constants, LEDs, pots, and buttons. Having done that, you focus on the node under the test. Upload the patch to verify that the node works as expected. Later, any xoder can view and upload the same example as well to learn how the node works.
Setting metadata #
To publish a library, you are required to set several project-level fields. All of them are accessible through the “Edit → Project Preferences” dialog.
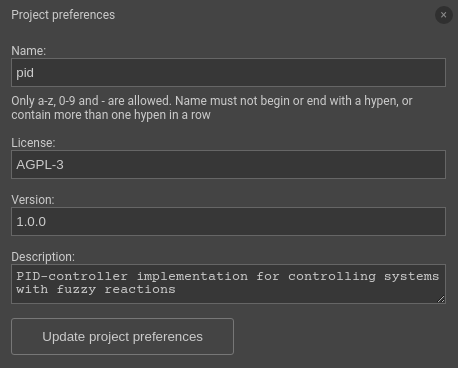
| Name |
The library will be available to others under the
yourusername/name full name. Use a short and descriptive
name under 20 characters.
|
| License | OSS license name defining terms of use for your work. Choose between MIT, BSD, GPL, etc. |
| Version |
The semver tag for
the upcoming publication. If you're about to publish a library for the
first time, as a rule of thumb, start with 1.0.0.
|
| Description | One- or two-tweet-long description for your library. It is shown on https://xod.io/libs/ and inside XOD IDE. |
Publish #
When ready, hit “File → Publish Library.” Review the proposed effects and click “Publish.”
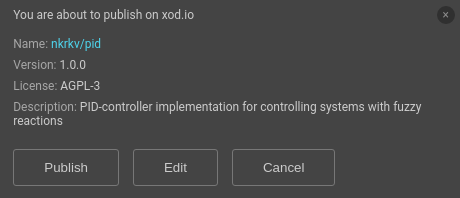
A few seconds later, your new library will be available at the Libraries section on the XOD site. Feel free to announce your treasure to XOD community.
Using own library #
To use a library you’ve published already in any other project, think of it as of a third-party library. That is, hit “File → Add Library” and install own library, just like anyone else would do.
Updating #
If you have published a larger-than-trivial library, you will likely want to release an update for it sooner or later. To do so:
- Open the library project.
- Make the required changes.
- Update the metadata.
- Publish again.
A special note on updating the version field: You are not allowed to re-publish the same version as any you have posted before. The version number must be bumped. The best practice is to follow the semver convention:
- increment the last number (1.3.1 → 1.3.2) if you’re just fixing bugs or improving the documentation;
- increment the middle number (1.3.1 → 1.4.0) if you’re releasing new features preserving backward compatibility – i.e., you are adding new features, not changing existing ones; and
- increment the first number (1.3.1 → 2.0.0) if you have made breaking changes.
Once the new version is published, to make it visible to your other projects, update the local installation of your own library by hitting “File → Add Library” again.