Defining Custom Types
XOD has plenty of built-in types: numbers, booleans, strings, and so on. They are enough to solve most of the tasks. However, there are times when a new type is much desired to express a concept that is not in the system.
That’s when custom types come into play. Let’s learn them by example. Suppose we want to define a new type to store time values. Time, in this case, is a value you think of when watching at a clock: “10:54:23”, for example.
We are going to make nodes for time creation and string formatting. Start by creating a new project.
Marker output-self #
In XOD custom types, as everything, are made out of patches. In xod/patch-nodes you’ll find an output-self marker node which acts like a regular output terminal, but rather than provide a value of a particular existing type, it defines a new type with the name of that patch. Such patch then is called a constructor of the type.
We’ll define a new type time. To do so, create a new patch time and place an output-self node on it.
Next, we should decide how the new type is represented internally in C++. All constructor patches should be implemented in C++.
In our case, one way to store the value is keeping the number of seconds past since the beginning of the day. That is:
0corresponds to00:00:001→00:00:0159→00:00:5960→00:01:003599→00:59:593600→01:00:00- and so on
We need to accept the number of seconds as a parameter of the constructor. Thus, we add an input-number node. And to provide the C++ implementation, we add the not-implemented-in-xod. Finally, our patch looks like:

Now, let’s write down the code. Follow the comments to understand essential parts:
node {
    // When defining a custom type you must declare a C++ type with name `Type`
    // inside the `meta` block.
    // It will be used by the system to store and pass values of the new custom
    // type in C++ land.
    // In our case the Type is a simple alias for a single number. However, you
    // might use a complex struct or class for this role.
    meta {
        using Type = Number;
    }

    void evaluate(Context ctx) {
        auto sec = getValue<input_SEC>(ctx);
        auto secsInDay = 24 * 60 * 60;

        // Use the `Type` type to define a new variable that will be
        // later output as the result. We use `fmod` to perform day-wrap
        // and be sure the value is in valid range
        Type out = fmod(sec, secsInDay);

        // Then we can output the new type value like a regular one
        emitValue<output_OUT>(ctx, out);
    }
}
At this point, we have a fully functional new type time, which one can construct using the time node. But we can’t do anything with it yet. Let’s improve it.
Inputs in C++ #
Let’s implement a node to split the time value into hours, minutes, and seconds. We’ll call it unpack. It should take a time value as an input and output the three values.
As you might notice, at the moment you place an output-self node on a constructor patch two new terminal nodes are automatically generated next to the constructor patch. In our example, they are input-time and output-time.
We use an input-time and three output-number to build the interface of our unpack patch:

Now, the C++ part. Follow the comments:
node {
    void evaluate(Context ctx) {
        // We use `auto` C++ keyword because the `Type` we defined earlier is in
        // another namespace. The `auto` type instructs the C++ compiler to infer
        // the actual type from a right-hand side expression and it will always
        // match the custom type, be it an alias, struct, or class.
        auto t = getValue<input_IN>(ctx);

        // Now we can use the fetched value as usual. Perform some truncations
        // and modulo divisions to convert seconds to hours, minutes, and seconds
        emitValue<output_SEC>(ctx, fmod(t, 60));
        emitValue<output_MIN>(ctx, fmod(trunc(t / 60), 60));
        emitValue<output_HOUR>(ctx, trunc(t / 3600));
    }
}
Good. Now we have a way to construct and “destruct” time values. See it in action by using the standard system-time as a source of seconds and an LCD as a display:
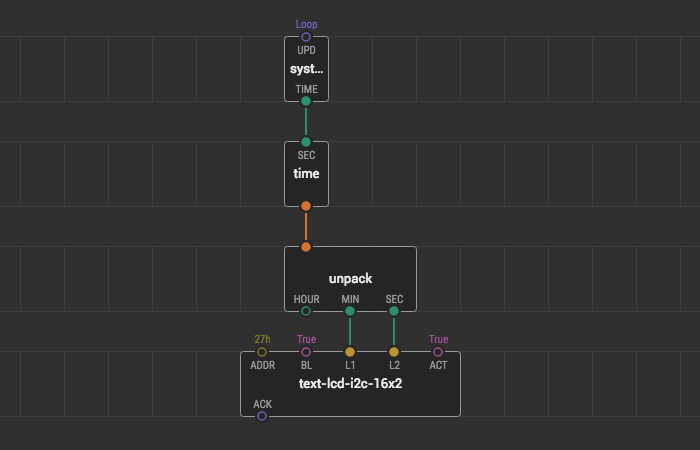
You’ll see the first line displaying minutes (0, 1, 2, etc) and the second line showing the seconds including fraction. Note how the seconds wrap at 60.
Inputs in patch nodes #
Now let’s make a patch node without touching C++ which takes a time value and outputs a string in ISO format: “01:33:59.” We’ll use unpack created in the previous section as an adaptor between the custom type and the types for which we have other nodes to process them.
A small utility node format-two-digits will be very handy here. It takes a number and outputs a two-digit string enforcing leading zero for values below 10. Without diving into details much, here’s its code:
node {
    char buff[3];
    CStringView view = CStringView(buff);

    void evaluate(Context ctx) {
        auto n = getValue<input_IN>(ctx);

        // convert to an integer in range 0-99
        uint8_t ndec =
            (n < 0) ? 0 :
            (n > 99) ? 99 :
            (uint8_t)n;

        // convert to characters, leave the last
        // char intact as it always \x00
        buff[0] = '0' + ndec / 10;
        buff[1] = '0' + ndec % 10;

        emitValue<output_OUT>(ctx, XString(&view));
    }
}
Given the unpack and format-two-digits, creating the desired format-iso becomes very straightforward:
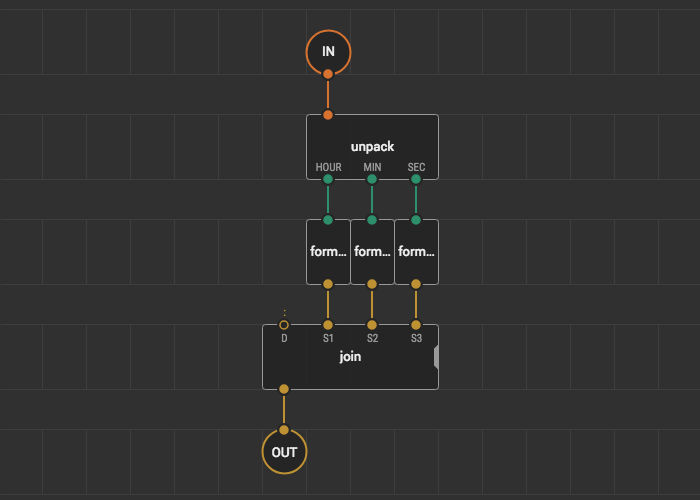
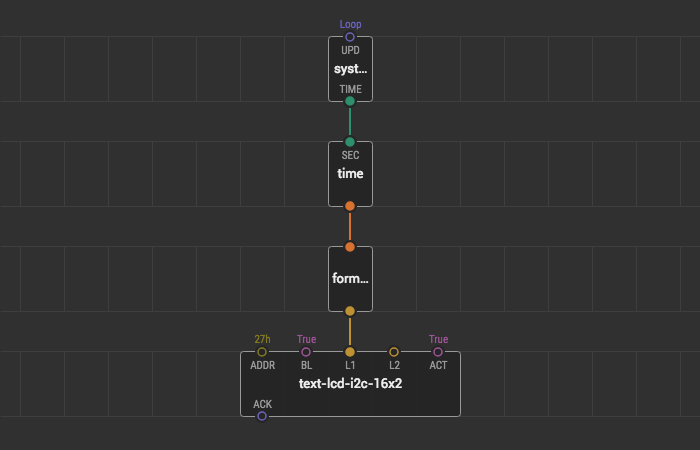
To test the new node use system-time and an LCD:
You’ll see the display starting by “00:00:00,” then “00:00:01,”… “00:00:59,” “00:01:00.”
Using the same technique, you can implement other nodes which take time values:
- 12-hour formatter
- equality / less / greater comparators
Outputs in patch nodes #
We have the constructor node time. What if we want to provide alternative constructors or other nodes with time output? That’s simple. Use a combination of an original constructor node and output-time on a new patch.
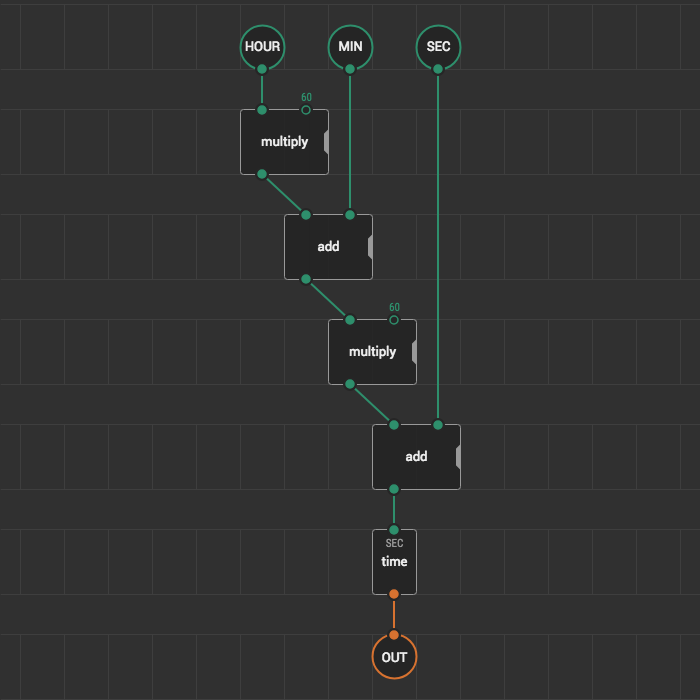
For example, let’s make an alternative constructor pack which works as an opposite to unpack. It should take hours, minutes, and seconds; and return time. The general idea is to transform the input values into a form acceptable for the constructor and send its output directly to the output-time terminal:
Outputs in C++ #
As an alternative to the previous implementation, let’s do the same to demonstrate how the custom type can be accessed from C++ when it’s only used as an output and thus the auto C++ keyword cannot be used to define a variable type:
node {
    void evaluate(Context ctx) {
        auto h = getValue<input_HOUR>(ctx);
        auto m = getValue<input_MIN>(ctx);
        auto s = getValue<input_SEC>(ctx);

        // Use typeof_... to access the type of a pin
        // if its symbol is hardly accessible in other ways.
        // In our case `typeof_OUT` refers to the
        // `Type` we defined in the constructor.
        typeof_OUT result = h * 3600 + m * 60 + s;

        emitValue<output_OUT>(ctx, result);
    }
}
Now you’ve learned how to introduce custom types. Use them wisely to create new powerful abstractions. Think about more complicated applications to get even more power from custom types: