Advanced Setup of W5500 Ethernet Shield for Internet
If you have an Ethernet Shield extension board based on a W5500 chip, it might be enough to place a single node for establishing an internet connection. Start with Quick setup guide to see if it fits your needs. In cases when more control is required you have to build a chain of several nodes which is described in this guide.
Adding device node #
First, you need to place a node which represents the shield: xod-dev/w5500/w5500-device.

The node has an input CS which defines the chip select port for W5500 IC. Leave it with the default D10 value for the standard shield as it physically wired to this port on the shield printed circuit board.
Assigning MAC address #
Another w5500-device input is MAC. It defines the so-called MAC address which is (roughly) a kind of serial number for network devices. All network devices should have a unique MAC address. At the very least, a router uses it to lease the same IP address to a device when it shuts down and then powers up again.
You should find a personal MAC for your hardware printed on a sticker in a form like “DE:AD:BE:EF:FE:ED”. The W5500 chip does not hard-code its MAC as many consumer devices do, so you have to provide it manually.
Place a xod/net/mac node and link its output to the input of w5500-device.
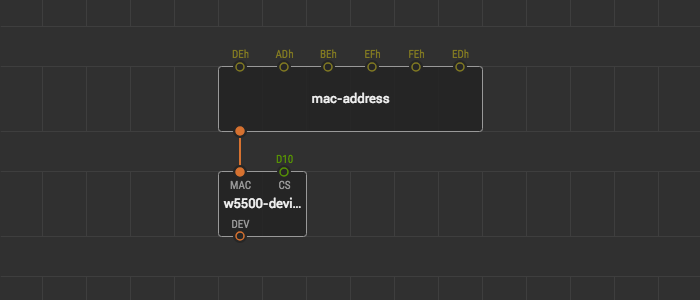
It has six inputs which denote each octet of the address. Octets are conventionally separated with colons when written in text, but they are not parts of the address on the data level. The parts are bytes values of which are written as hexadecimal numbers between them. So, for example, if the address is “DE:AD:BE:EF:FE:ED” you need to bind the following values to mac in Inspector:
DEhforIN1ADhforIN2BEhforIN3- …etc up to
EDhforIN6
The h suffix denotes a hexadecimal byte value in XOD.
Connecting to LAN with DHCP #
Now, when the Ethernet Shield device is properly configured, we can connect to LAN. The simplest way to do it is the xod-dev/w5500/connect node. Place it and link to the device node:
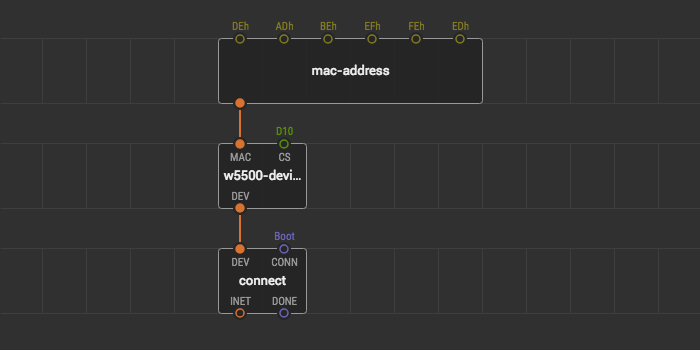
The connect node has a DEV input expecting a configured device. The rest works in the same way as described in the Quick setup guide for the ethernet-shield node:
CONNinitiates the connection process with the DHCP negotiationINETrepresents the resulting internet connectionOKpulses on success
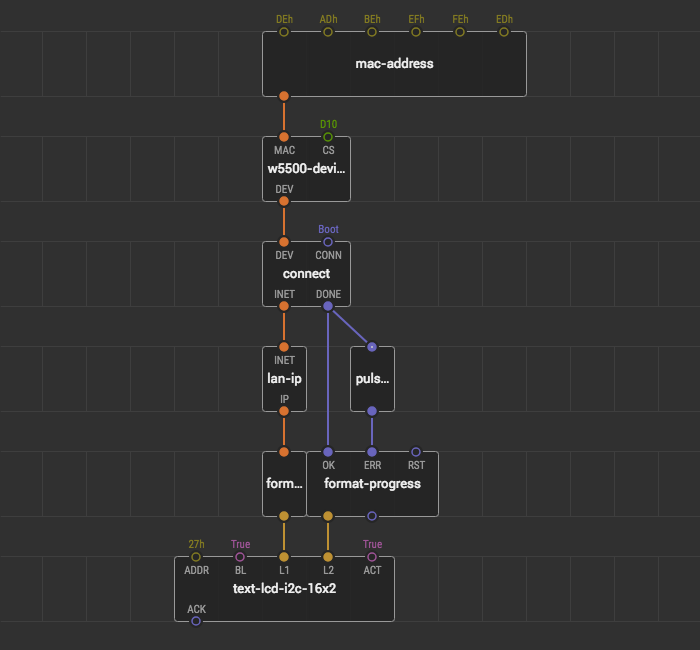
To check the connection you can use lan-ip, format-ip, and format-progress nodes:
Connecting to LAN with static IP #
As an alternative to connecting via DHCP, you may prefer to connect manually with specific network parameters. Although the process is a bit more complicated, it makes your device more robust in the case of persistent hardware setup.
While connecting manually you have to provide your gateway IP, DNS, network mask, and own IP explicitly, but on other hand, you make connection quicker and save a few dozen bytes of precious memory because the microcontroller does not have to remember DHCP protocol details.
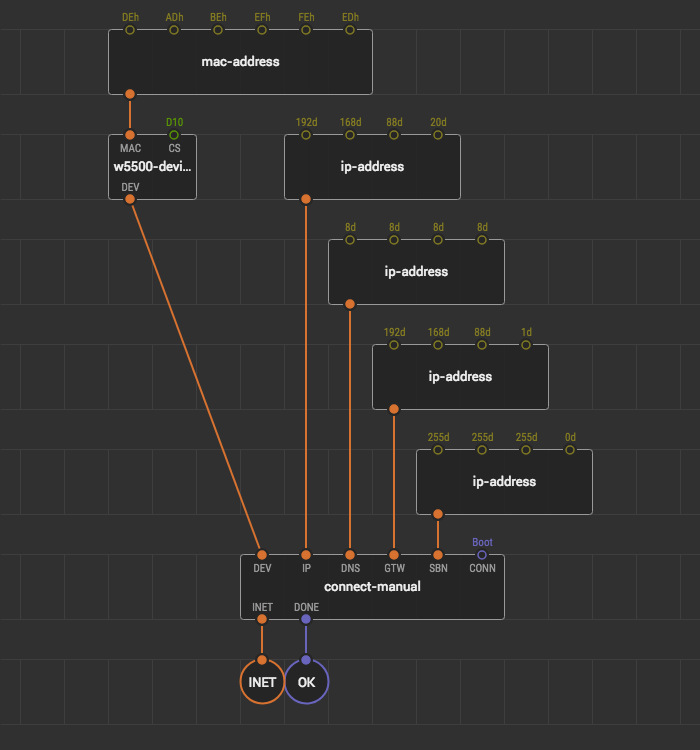
To establish a link with static IP and network parameters, use xod-dev/w5500/connect-manual instead of connect.
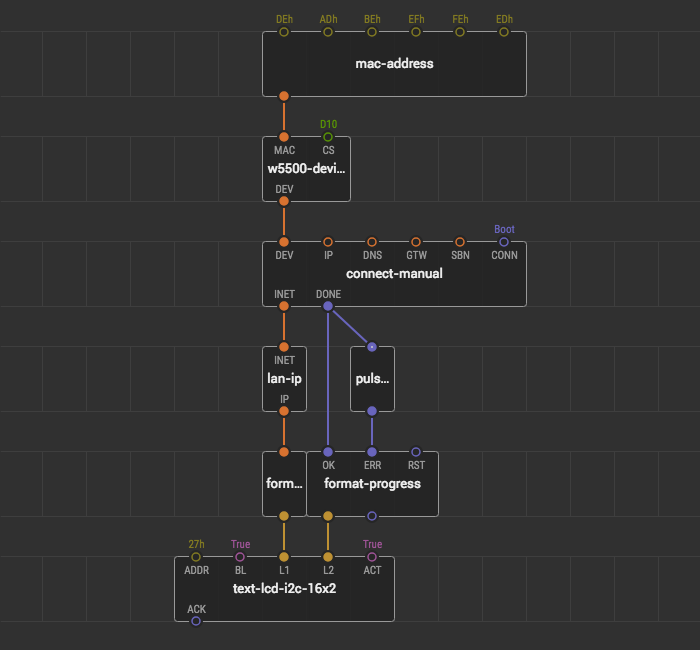
The node has several inputs of type xod/net/ip-address to specify the LAN parameters. Use an ip-address node for each of the inputs.
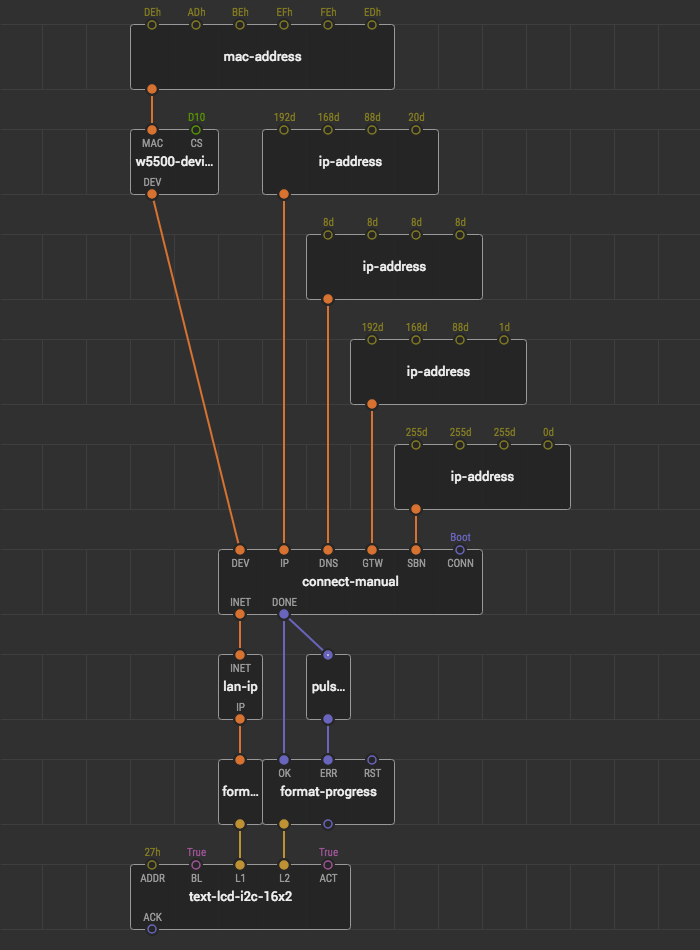
The ip-address node has four inputs which represent the four octets (bytes) of an IPv4 address. When written in a text the octet values are separated by dots, but they are not the part of IP address per se, so to specify “192.168.0.1” address, for example, bind the following values:
192dforIN1168dforIN20dforIN31dforIN4
The d suffix denotes a decimal byte value in XOD.
Encapsulating Internet #
There is a clear mental line between connecting to the internet and using it. In real projects that are more complex than trivial, it is a good idea to put all the boilerplate related to the connection on a separate patch node. That way you can just use your own node internet when a connection is required without thinking about setting up again and again.
Here is a possible internet node implementation.
Note how we used a xod-dev/w5500/output-w5500-internet and two output-pulse’s for output terminals. Later you can change your mind and change network settings or even the hardware module just by tweaking the internet patch and the use of the internet will remain simple.

Whatever connection method you used when you have a working INET connection, you are ready to use it for something useful. Proceed to Fetching data from web with HTTP GET for an example.